Tank setup update
Moderator: LoachForumModerators

-
Keith Wolcott

- Posts: 720
- Joined: Sun Mar 04, 2007 1:49 pm
- Location: Charleston, Illinois USA
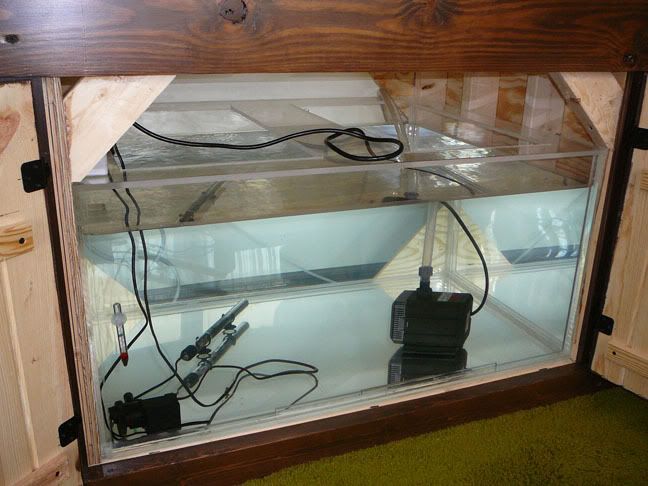
It holds 80 gallons if filled to the top. I have a float valve installed near the top that automatically shuts off the input water. Also the pump that pumps the water into my 75 gallon aquarium cannot drain the R.O. tank completely so that means I have 60 gallons of usable water. Right now I am doing 10% water changes each day. I first add minerals and then pump 7 gallons to the aquarium and the R.O tank refills automatically. The process of pump out, add minerals, and then pump in, takes 2 minutes.
When I get the 340 gallon tank, I will be using it to change about 35 gallons per day, but will be able to do a 60 gallon change should the need arise. It will take about 10 minutes to do the water change.
Sorry, no time for pictures tonight.
When I get the 340 gallon tank, I will be using it to change about 35 gallons per day, but will be able to do a 60 gallon change should the need arise. It will take about 10 minutes to do the water change.
Sorry, no time for pictures tonight.
-
Keith Wolcott
- Posts: 720
- Joined: Sun Mar 04, 2007 1:49 pm
- Location: Charleston, Illinois USA

-
Keith Wolcott
- Posts: 720
- Joined: Sun Mar 04, 2007 1:49 pm
- Location: Charleston, Illinois USA
chefkeith- Sorry, I didn't take any pictures while building the tank. I knew that it would be a learning experience since no matter how much you learn from good sources (there are some excellent web sites) there are always details that you can really only learn by doing. The detail that I failed with at the start was that I thought that the solvent would soften up the acrylic enough to make small imperfections from the cutting even out. Thus, my first attempt leaked. The solvent does soften the acrylic but only a very small amount. To fix it, I cut 3/8 by 3/8 strips of acrylic and this time worked hard at smoothing out the edges and then put them around the bottom edge and in the four corners (you can see these in the picture). This almost worked, but where two of my strips were joined in the middle of the front, you can see I added another strip because there was a very, very slow leak at that seam. That fixed it. By this stage I was getting quite good at understanding exactly how much solvent to apply and let the capillary action pull it into the joint. If this had been a show tank it would have been a complete failure, but since it is under the stand it is a success!
For anyone thinking of building their own acrylic tank,
A good web site is
http://www.cichlid-forum.com/articles/d ... uarium.php
Be sure to prepare all edges so that they are perfectly smooth and you have a really good fit. If you do, it works really well.
Dutch- Yes, the tank is just being used for water changes. R.O. water is reverse osmosis filtered water. Locally the water here is very hard, and this way I can get soft water which our loaches like. Also the water quality is dependable. I don't have to worry about spikes in phosphates or other things that show up in our local water. The filter takes out all of the minerals so some have to be added back in. I am using RO right by Kent for this.

water bridge design
There was some discussion a few posts back about building water bridges and what the best design might be... something I have thought about off an on for the past few months. For me, money and appearance are NOT priorities, but ease of construction/installation/maintenance are all very important.
Design-wise, the biggest challenge I face is that with my current aquarium setup, I would need a bridge that bends 90* at around the 1-foot mark, 2-foot mark, and 10-foot mark (yes, I want the bridge to span 10-12 feet).
Ideally, I would want the structure to be flexible so that I can bend it into another configuration relatively easily. So I did some searching on the net, and found that there is such a material as clear, FLEXIBLE pvc pipe. You can find it w/ ID of 3-4 inches (which is more than enough I think), and it is affordable (not cheap though).
It looks flexible enough that I can just bend it however I want, and I would only need to figure out how to support its weight at various intervals from the floor (I can build or buy a few stands for that... again I don't care about looks).
I would only need to buy some clear PVC caps (of same ID) for the ends (that can screw air tight), and then a "T" fitting to put in the middle of the bridge. I would use PVC cement to attach the bridge to both sides of the "T", and then I add some caps to seal/unseal the ends of the bridge and top of the "T". All the parts I have mentioned can be easily found in 3-4 diameter by searching Google.
With this kind of configuration, I could simply bend the bridge however I want and then cap off the two ends (submerged in water) and begin filling it w/ tank water from the top of the "T" (which is located at the center of the bridge). Once I have filled it up, I can cap off (seal) the "T" fitting, and then unscrew the 2 ends of the bridge while submerged in the water. Simple vacuum pressure would keep the bridge from draining at that point, and viola you have a 10-12 foot bridge that's easy to bend, install, fill, and maintain.
This would require buying at least 12' of 3.5"-ID clear flex pvc pipe (or up to 25' if the mfr requires), along w/ 1 clear "T" fitting and 3 clear screwable cap fittings (for sealing/unsealing "T" and each end of bridge). I would also need pvc cement to glue the components together, but that would be easy I think.
If there is something flawed about this design, then please someone let me know... otherwise I think I'm actually going to order the parts in the next few months (as soon as I have time, been busy at work lately). Based on the prices I have looked at, I think this will probably cost as much as $1000, since it will be 3-4" ID and 100% clear.
Thanks in advance to anyone who replies.
*** EDIT ***
Here is where you can purchase flex pvc pipe, as well as the "T" and cap fittings I mentioned, all up to ID of 4".
http://www.newageindustries.com/clearfl2.asp
http://www.clearpvcpipe.com/
*** END OF EDIT ***
And for anyone interested, here is my current fish (just one) + 75g tank:
http://www.etherice.com/rmx/rmx.php?x=cobol_2007
I've had it for 5 years now, and still love it. For those unfamiliar w/ African cichlids, they HATE having tankmates... so this one is happy to have its own 75g domain... I've never seen such a happy/healthy fish as this one, and have no interest in getting a tankmate for it... perhaps when I connect another 75g tank I will consider it.
sbaldwin- That sounds like a great idea. What kind of flexible pipe is it?
Is it like this or something else? -

http://www.aquaart.com/flexpipe.html
I'm interested in how this project works. Please Keep us updated.
edit- -OK I've seen your edit. I'm not sure if that kind of clear tubing will have the wall strength necessary to hold it's round shape. The bottom might flatten out when filled with water because of the weight and suction that the water will create.
Is it like this or something else? -
http://www.aquaart.com/flexpipe.html
I'm interested in how this project works. Please Keep us updated.
edit- -OK I've seen your edit. I'm not sure if that kind of clear tubing will have the wall strength necessary to hold it's round shape. The bottom might flatten out when filled with water because of the weight and suction that the water will create.
Last edited by chefkeith on Sun May 18, 2008 3:09 pm, edited 1 time in total.
*** edit (merged 2 posts into 1) ***
The product I was looking at is at:
http://www.newageindustries.com/clearfl2.asp
I like the fact that its resistant to bacterial/algae growth, and that it has nothing lining its walls to obstruct the view. However, you raise a very good point about the pressure potentially distorting its round shape over time.
I do like the product you linked to, since it is probably less expensive and has the inner coil to absorb the stress and prevent distortion. If it is completely non-toxic and resistant to bacterial growth as well (didn't check) then it is probably the better pipe to go with.
ETA-wise, I probably won't get around to this until mid-summer since I am flooded at work, but once I finish the project, I will certainly post pictures, etc., so that everyone else can have an intertank highway!!
Last edited by sbaldwin on Sun May 18, 2008 3:38 pm, edited 2 times in total.
-
Keith Wolcott
- Posts: 720
- Joined: Sun Mar 04, 2007 1:49 pm
- Location: Charleston, Illinois USA
sbaldwin- Very nice ideas. A possible alternative to the T in the middle and capping the ends to fill, is to put a small valve in the middle on top and then, with the ends submerged, suck the air out to fill it with water. I also like chefkeith's simplest solution: Insert a piece of small tubing into one end and suck the air out.
I also think that chefkeith's point about the tube collapsing is important. Imagine sucking the air out of the tube. Depending on the strength of the tube, either it pulls the water up into the tube, or it collapses the tube. Even with your method of filling, once the tube is full of water and you take off the endcaps, gravity will be pulling the water down. If the tube is not strong enough, gravity pulling the water down into the tank will collapse the tube.
I also think that chefkeith's point about the tube collapsing is important. Imagine sucking the air out of the tube. Depending on the strength of the tube, either it pulls the water up into the tube, or it collapses the tube. Even with your method of filling, once the tube is full of water and you take off the endcaps, gravity will be pulling the water down. If the tube is not strong enough, gravity pulling the water down into the tank will collapse the tube.
-
Keith Wolcott
- Posts: 720
- Joined: Sun Mar 04, 2007 1:49 pm
- Location: Charleston, Illinois USA
On another note, my 340 gallon tank plans have fallen through. Instead of the tank arriving imminently, the company (Aquariums For You) has gone out of business and will not be building my tank. This is a bit disappointing after waiting 5 months since ordering it.
I am now looking for another company to build the tank.
I am now looking for another company to build the tank.
Intertank Highway
*** Water Bridge Update ***
The Design:
http://www.etherice.com/img.php?p=graph ... f&bg=white
I have located all the parts, and have already ordered some of them. I plan to actually build this in the next 4-6 weeks (depends on how busy I am). I now estimate the total cost to be about $500 (I have decided to only buy the bridge pipe in clear).
Also, perhaps this should become a new/separate thread? I plan to make more posts whenever there is progress to report.