Plumbing a river

The forum for the very best information on loaches of all types. Come learn from our membership's vast experience!

Moderator: LoachForumModerators

User avatar
LES..
Posts: 296
Joined: Tue Jan 10, 2006 1:34 pm
Location: Surrey, UK
Contact:

Plumbing a river

Post by LES.. » Wed Mar 21, 2007 7:54 pm

At last the tank in plumbed!
After all the procrastination, cold hours in the spent out in the twilight and various set backs i have the manifold for my new river tank built.

First of all, an overview:
Image
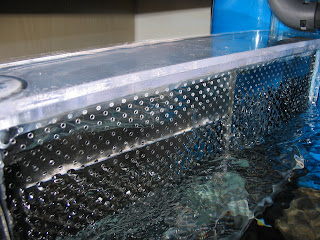
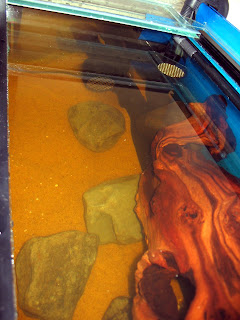
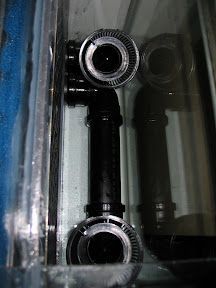
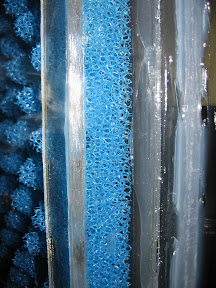
This screen separates the pumps from the main space in the aquarium, it is constructed out of clear plastic sheet, a support grid and pond filter sponge. In the bottom left you can see the two return pipes which route back to the other end of the tank where i have a diffuser box.
Image
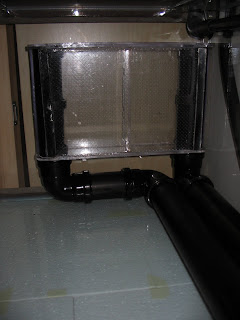
The use of this box really helps stabilise the pipes with cross bracing holding them together. Without this is rear pipe has no torsional support and will rotate freely along its length.

That's the manifold, on to the pumps.
Image
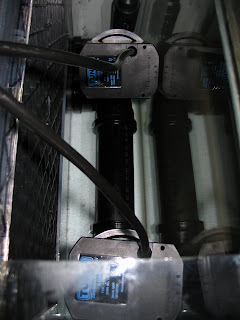
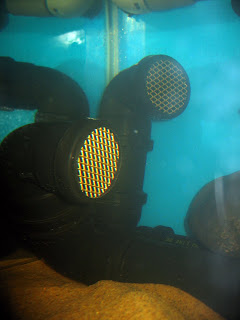
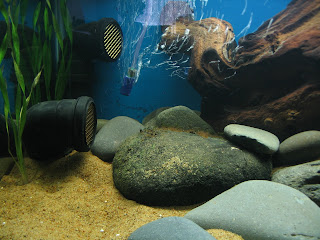
This view shows the pumps in their partition behind the screen they are Tunze streams 6060, the babies of the range, so if i want to step up to 40,000 litres an hour the option is available ;-) This shot also shows some of the supporting grid behind the sponge.
Next up how to mount the pumps:
Image Image Image Image
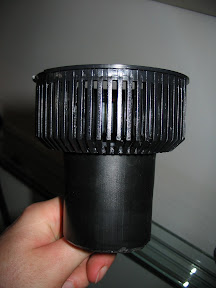
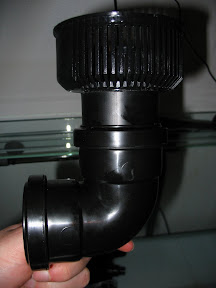
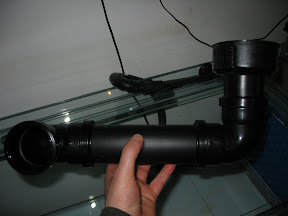
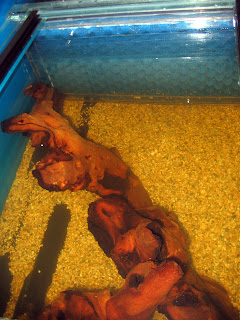
The cowling for these pumps has a 1.9" bore outflow, as a result the external diameter is just over 2" perfect fit with the 2" internal diameter of the pipe i had selected. Well almost, the liberal application of a heat gun was required to get the cowling to fit into the pipe, once cooled this provides a very secure mounting. The pipe is then inserted into 90 degree connectors which then link to the long return pipe work.

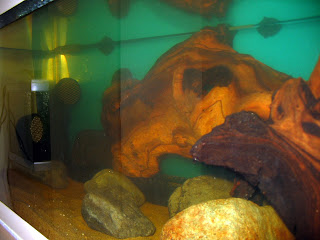
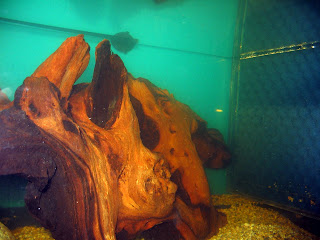
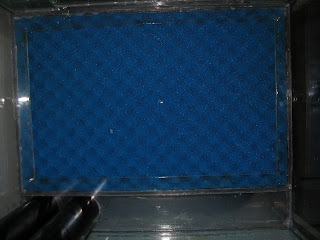
A little more detail on the partition (please excuse my sloppy use of sealant):
Image
The partition is constructed from two sheets of plastic laminated together with sealant, the front sheet effectively allows the support grid to be positioned on to the rear sheet correctly but also gives more strength and works as a guide for attaching it to the tank. it was my first attempt at this which broke a few weeks back.
Image Image
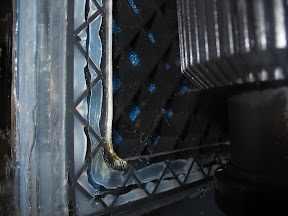
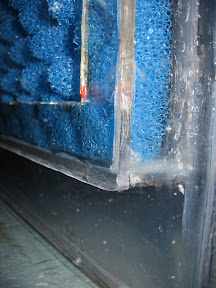
A retaining edge was then stuck to around the support grid to hold the sponge in place.

Full size images can be found in the web album. Posting this now has probably doomed the project to failure as i have yet to fill the tank and test the flow but never mind.

Hope you have enjoyed it.
LES..

User avatar
Emma Turner
Posts: 8901
Joined: Wed Dec 28, 2005 5:07 pm
Location: Peterborough, UK
Contact:

Post by Emma Turner » Wed Mar 21, 2007 8:32 pm

Very cool, LES..! 8) Fingers are crossed for your trial run. :D

I do think the blue sponge will clog surprisingly quickly because of the pull of those Tunze pumps though. Are you able to slide that out and replace with another sheet of sponge as and when required?

Emma
Image
East of the Sun, West of the Moon.
Image

User avatar
Martin Thoene
Posts: 11186
Joined: Wed Dec 28, 2005 5:38 am
Location: Toronto.....Actually, I've been on LOL since September 1998

Post by Martin Thoene » Wed Mar 21, 2007 9:45 pm

Looks awesome! Emma's having the same questions that I would have asked because they're all things I've considered before when messing around with my double tank idea with the false floor. I decided to just go with mesh that lets the water pass through, but keeps lil' fishes out.
Filter elsewhere in the system.

Martin.
Image Resistance is futile. You will be assimilated.

Image

User avatar
Jim Powers
Posts: 5208
Joined: Wed Dec 28, 2005 6:15 pm
Location: Bloomington, Indiana

Post by Jim Powers » Wed Mar 21, 2007 10:33 pm

Very cool!
It will be interesting to see it when its completely set up and running.
Image

User avatar
LES..
Posts: 296
Joined: Tue Jan 10, 2006 1:34 pm
Location: Surrey, UK
Contact:

Post by LES.. » Thu Mar 22, 2007 4:05 am

Thanks for all the comments :-)
Emma Turner wrote:I do think the blue sponge will clog surprisingly quickly because of the pull of those Tunze pumps though. Are you able to slide that out and replace with another sheet of sponge as and when required?
Clogging is one of my fears too which is the reason i have gone for sheet as large as i can fit in the tank to provide maximum area to spread the debris, also this is a coarsest sponge I can find. That said it is easily removable and not too difficult to refit although I have yet to attempt that while the partition is installed in the tank. I did spend a long time thinking about how to hold the sponge in place, there is basically a 1" lip around the edge of box to hold the sponge in place and it is a simple question of just sliding it in (when dry and on a flat surface...).

In a similar way the pumps are mounted vertically for ease of access, it is a simple matter of reaching in and twisting to remove them for maintenance. The cowling remains attached to the manifold when doing this.

Hopefully the weather will clear this evening and i'll be able to start getting the substrate washed.
LES..

User avatar
Mad Duff
Posts: 2821
Joined: Fri Mar 03, 2006 9:58 am
Location: Middlesbrough, UK
Contact:

Post by Mad Duff » Thu Mar 22, 2007 5:13 am

Looking good Les, fingers crossed for the trail run :)

I think you should be ok with that sponge, it is the same as I use in my pond filters and even fully clogged with debris they still allow the water through at a fair rate and these are have 5000 litres/hour passed through them :)
Image

Pardon my honesty - I am a Northerner

14 loach species bred, which will be next?

User avatar
Graeme Robson
Posts: 9096
Joined: Wed Dec 28, 2005 4:34 am
Location: Peterborough, UK
Contact:

Post by Graeme Robson » Thu Mar 22, 2007 3:23 pm

Nice looking project LES.. 8)

Good luck bud!
Image

User avatar
LES..
Posts: 296
Joined: Tue Jan 10, 2006 1:34 pm
Location: Surrey, UK
Contact:

Update on the tank.

Post by LES.. » Tue Mar 27, 2007 7:20 pm

Well i have now filled the tank and experienced the power of the Tunze streams. If there was one word to describe the flow these things create it would be 'Epic' and that's just for the smallest pumps in the range. I envy Emma's Clowns and their 6200, cranked up to its max that can push 40,000lph which is just mind boggling.
To give a feel of the draw on these pumps, i had originally set up the filter intake to sit next to them, doing so resulted in the whole canister back siphoning from the out flow. It took me a while to get the cannister primed after that.

First off a shot of the tank on its first trial, note that i had only half filled the tank to gage the amount of back pressure the diffuser box would create, as you can see by the raised water level in the box, quite a bit.
Image
In an effort to combat this i drilled out half the holes in the diffuser box to be twice the size, this considerably reduced the back pressure but i realised that the diffuser was working far too well and the only flow i was getting was a gentle wash down the tank. Not quite the hill stream effect i was after. With that in mind i dicided to junk the whole diffuser idea and just go with the right angle bends with a mesh guard.
Image
It was a hard blow to realise that i had wasted so much effort on the diffuser when a simple option proved far more effective. Never mind.

A few more shots with some decor in place:
ImageImageImageImage
As you can see half the tank uses sand while the other half is gravel. I have a row of rocks down the middle separating the two substrates which is mostly hidden by the wood. Lots more pebbles required and plants still to come. I also need to be very careful about where i direct the outflows as they managed to carve some lovely dunes in the sand in next to no time.

I have hit another problem, i had intended to use an Arcadia I bar lighting solution on this tank but the unit is too tall to fit between the canopy and the glass covers.

It's getting there :-)

User avatar
Keith Wolcott
Posts: 720
Joined: Sun Mar 04, 2007 1:49 pm
Location: Charleston, Illinois USA

Post by Keith Wolcott » Tue Mar 27, 2007 7:41 pm

Nice job LES..! Your Hillstreams are going to like that current.

User avatar
Jim Powers
Posts: 5208
Joined: Wed Dec 28, 2005 6:15 pm
Location: Bloomington, Indiana

Post by Jim Powers » Tue Mar 27, 2007 8:53 pm

Very nice!!
I can't wait to see more pics.
Image

User avatar
Emma Turner
Posts: 8901
Joined: Wed Dec 28, 2005 5:07 pm
Location: Peterborough, UK
Contact:

Post by Emma Turner » Wed Mar 28, 2007 11:28 am

Cool stuff, LES..! 8) Yes, those Tunze streams are 'beasts' aren't they? :lol:

Emma
Image
East of the Sun, West of the Moon.
Image

User avatar
Mad Duff
Posts: 2821
Joined: Fri Mar 03, 2006 9:58 am
Location: Middlesbrough, UK
Contact:

Post by Mad Duff » Wed Mar 28, 2007 11:37 am

Very nice Les :) , Im sure your Hillies will love their new home.
Image

Pardon my honesty - I am a Northerner

14 loach species bred, which will be next?

User avatar
Graeme Robson
Posts: 9096
Joined: Wed Dec 28, 2005 4:34 am
Location: Peterborough, UK
Contact:

Post by Graeme Robson » Wed Mar 28, 2007 6:14 pm

Superb work Les..! 8)

Keep us updated.
Image

User avatar
LES..
Posts: 296
Joined: Tue Jan 10, 2006 1:34 pm
Location: Surrey, UK
Contact:

Post by LES.. » Thu Apr 05, 2007 2:45 pm

An update on the tank, It is finally coming together!
Image
Now that i have the lights in i can finally get a nice panoramic shot of the tank without having lots of flash points bouncing off the glass everywhere. Click on the picture for the full size version.
Image
The air stone you see there is just temporary to provide nucleation points for fine particles of dust and helps clean the water but provides a point of reference for the flow.
More plants are on their way, Microsorium Windelov and anubas batterii to cover the wood along with some java moss. Some more Vallisneria asiatica to fill out the rest of the tank, i'm hoping that this is going to give some fantastic movement with all the flow.

No fish in there yet, i think i will give it a few more days with just the plants before introducing them :-)

LES..

(edit to change the link on the first image)
Last edited by LES.. on Thu Apr 05, 2007 2:53 pm, edited 1 time in total.

User avatar
Jim Powers
Posts: 5208
Joined: Wed Dec 28, 2005 6:15 pm
Location: Bloomington, Indiana

Post by Jim Powers » Thu Apr 05, 2007 2:47 pm

Very nice!! I can just imagine that bogwood being grazed by dozens of tiny chenis. :wink:
Image

Post Reply

Who is online

Users browsing this forum: No registered users and 225 guests