Thanks everyone for the kind comments. I still can't believe that the tank is on the stand. I keep walking into the room to see that it is still really there. We had a fun party with lots of food and drink-after the raising. Chefkeith- no one dressed up for Halloween, but we played quite a few rounds of the game called bags (very popular among college students in this area. You throw bean bags at a sloped board with a hole in it.)
Now I need to get the pipework done. I have the bulkheads, but have to get to the hardware store for connecting pipe.
Tank setup update
Moderator: LoachForumModerators

-
Keith Wolcott

- Posts: 720
- Joined: Sun Mar 04, 2007 1:49 pm
- Location: Charleston, Illinois USA
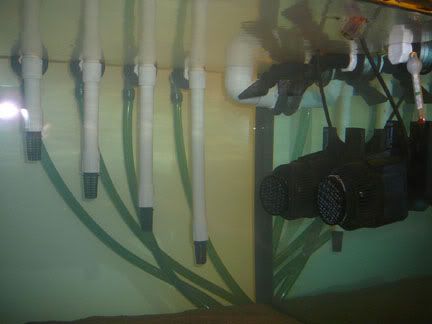
I've had a chance to make some progress. The water is in and the filters are running. It was a lot of work to rinse 275 lbs of sand.
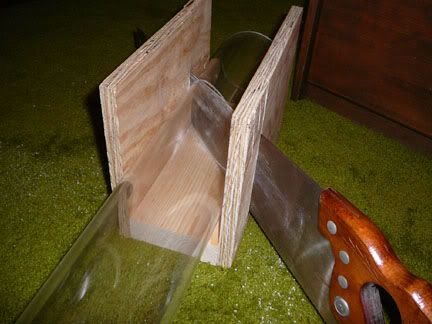
To build the water bridge out of 4.5" pipe, I first built a miter box so that I could get a good cut. This fairly fine toothed rip saw did a nice job, but I went slowly, taking about 20 minutes for a cut.
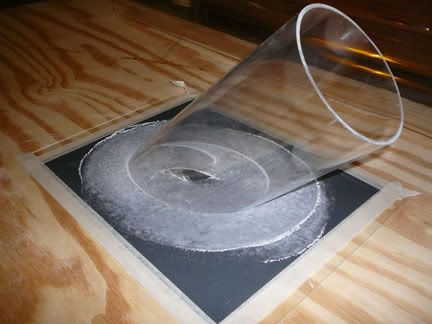
In order to get a good seal I put sand paper on a piece of glass and sanded the cut edges. I started with 220 grit, then 400, 800, and 1500 grit sand paper.
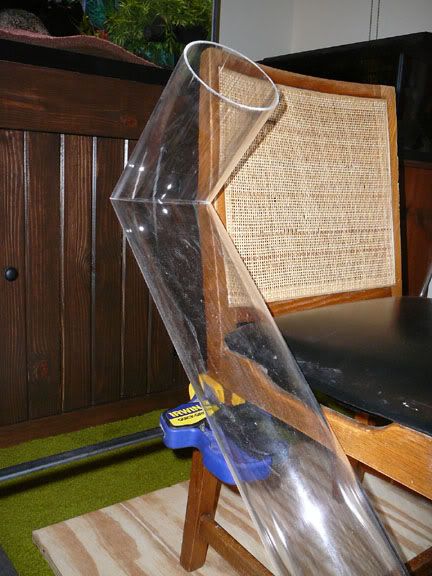
Ready to apply the solvent (actually just before using the solvent, I covered it with tape and plastic so that any solvent that drained down would not etch the surface.)
On the first joint that I glued, I had a small leak. I applied more solvent and pressed it together firmly for about 4 minutes and it sealed. On the second one I was careful to hold it together for a good 4 minutes (until my hands were numb) and it sealed perfectly.
Then I built the lids out of .22" acrylic and aluminum for support.
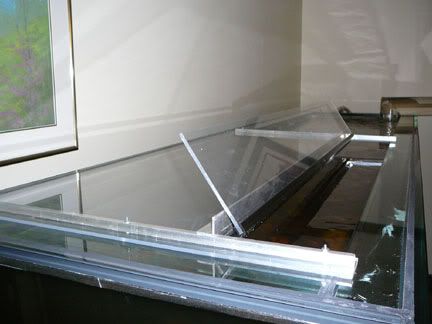
With the lights on top.
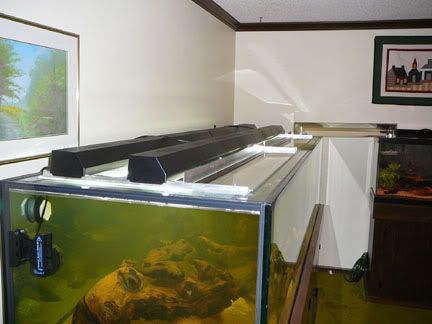
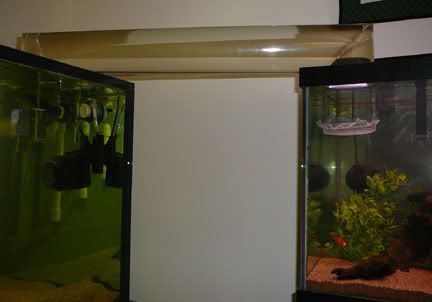
The water bridge in operation. I have a net covering the right end so that the fish cannot yet go through. I am gradually mixing the water of the two tanks, before I allow the fish access to the large tank.
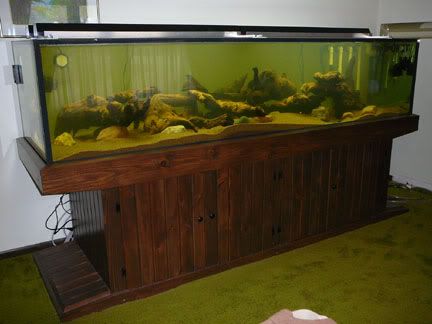
The 300 gallon tank.
To build the water bridge out of 4.5" pipe, I first built a miter box so that I could get a good cut. This fairly fine toothed rip saw did a nice job, but I went slowly, taking about 20 minutes for a cut.
In order to get a good seal I put sand paper on a piece of glass and sanded the cut edges. I started with 220 grit, then 400, 800, and 1500 grit sand paper.
Ready to apply the solvent (actually just before using the solvent, I covered it with tape and plastic so that any solvent that drained down would not etch the surface.)
On the first joint that I glued, I had a small leak. I applied more solvent and pressed it together firmly for about 4 minutes and it sealed. On the second one I was careful to hold it together for a good 4 minutes (until my hands were numb) and it sealed perfectly.
Then I built the lids out of .22" acrylic and aluminum for support.
With the lights on top.
The water bridge in operation. I have a net covering the right end so that the fish cannot yet go through. I am gradually mixing the water of the two tanks, before I allow the fish access to the large tank.
The 300 gallon tank.

Rinsing sand is a big job. I usually just dump it in the tank and let the filters do the work. I stuff the filters with activated carbon and filter floss, then stir the sand occasionally and wait until the water is crystal clear. It usually takes several hours to a few days depending on the quality of sand.
Great job on the water-bridge. I think the fish will really enjoy the element of exploration that it adds.
Job well done.
Great job on the water-bridge. I think the fish will really enjoy the element of exploration that it adds.
Job well done.

-
mickthefish
- Posts: 3281
- Joined: Sun Sep 10, 2006 7:20 pm
- Location: manchester, england

-
wasserscheu
- Posts: 995
- Joined: Tue Aug 29, 2006 9:29 am
- Location: Munich
Congratulations - simply beautiful 
Keith, it will be fascinating to hear which fish made it first through the pipe... would you mind giving us a detailed report, which ones are the first and which are not seen traveling yet?
When I connect my tiny tanks, I just pump water with a small pump from one tank to the other. The return flow happens via the waterlevel difference, automatically through the waterbridge. In your case from the old (smaller) one to the new larger one. That mixis the water and creates a flow through the water bridge, which makes it more attractive to the fish to get into it (as my system is somewhat dangerous, I always use 2 waterbridges, one for the fish to commute, one strictly for waterflow-function (those pipes are caped), as a back up, in case any fish or whatever plug the commuting pipe).
I am excited about your project ... I'd love to drop bye and admire you getting it finished... and whatch any fish exploring the pipe...
Wolfram
-
Graeme Robson

- Posts: 9096
- Joined: Wed Dec 28, 2005 4:34 am
- Location: Peterborough, UK
- Contact:

-
Keith Wolcott
- Posts: 720
- Joined: Sun Mar 04, 2007 1:49 pm
- Location: Charleston, Illinois USA
Thanks everyone.
chefkeith- I have done sand in the past without rinsing, but I had to clean grit out of the filter pump motors many times. This time, I still had to twice clean grit out of a pump motor, but then all has run smoothly.
Mick- Yes, I am excited about getting fish! But, I hope to control myself and choose carefully and slowly. First dithers (I want to get Rasboras- I really like Madd Duff's selection- especially the Rasbora Rasbora) and then clowns and more kubs.
Wolfram- Drop by anytime. I will have one canister filter with input in the small tank and output in the large tank. I have an emergency overflow to a drain on my large tank in case the water bridge loses its siphon. I had not thought of having a second hose as a backup. That is an excellent idea which I will do.
I will watch carefully when I open the water bridge to see who is first and if I can entice them with current and/or food. Hopefully I will get some pictures.
Graeme- Thanks for the double superlative!
-
Emma Turner

- Posts: 8901
- Joined: Wed Dec 28, 2005 5:07 pm
- Location: Peterborough, UK
- Contact:

-
wasserscheu
- Posts: 995
- Joined: Tue Aug 29, 2006 9:29 am
- Location: Munich
Thanks, I'll bring Munich brewed beer.Keith Wolcott wrote: ...
Wolfram- Drop by anytime. ...
I was thinking of you, during adding a big "curver" bucket (50 liter) via a 1 1/4" pipe to my q-tank which is 3' away from it.
After I added an upside down T-piece to the bottom of the waterbridge the Syncrossus thought it's a cave and went into it, and swam more than 3' "in the air" through the pipe, but did not enter the bucket yet.
An U piece, leading loaches down (into the substrate) first and than changing direction to the waterbridge, will get even small fish very quick to the other tank. The U-piece also will make sure that air bubbles and floating stuff won't enter the waterbridge.
Wolfram
Who is online
Users browsing this forum: No registered users and 357 guests