I am surprised, that prius looks like it hauled the lumber just fine lol! Just as long as you dont have to stop quick... then you might need a new windshield...
Wow 3 Eheim3's... thats nice! Along with the Rena (XP3 I assupme?) and some water circulation pumps sounds like plenty to me. Just curious though, have you looked at the Ocena Clear canisters? For something as large as your tank I wonder if it would be easier than dealing with 4 canisters? Of course you could still always run 1 or two canisters for redundancy.
Tank setup update
Moderator: LoachForumModerators
-
crazy loaches

- Posts: 708
- Joined: Thu Sep 28, 2006 7:12 am
- Location: Gahanna, Ohio
- Contact:

-
Keith Wolcott

- Posts: 720
- Joined: Sun Mar 04, 2007 1:49 pm
- Location: Charleston, Illinois USA
Tristan- Yes Rena XP3. Yes, I have looked at Ocean Clear canisters. Have you used these? I have not heard what anyone's firsthand experiences are with them. I was just going with Eheim since I have used them and had no problems. And they are very quiet. As Emma has said, they are expensive, but worth it (Ken's has the Eheim 2080 on sale for $320 which is not a bad price for a lot of filter). Also, I think I will be able to clean just one canister each week (This will of course depend on the stocking level).
chefkeith- One thing that I did not say before (other duties were calling) was that the 4 canister filters are for both the 300 gallon and the 75 gallon tank. I plan to have them connected with one of your water bridges (I cannot resist that very cool idea). That's about 1500 gph filtration on a 400 gallon system.
One issue that I am struggling with is the drilling of the aquarium. First, I want all holes near the water level. This is slightly safer as far as potential leaks go and for my setup it will be less visible in the tank. I am putting one hole on the back right and one on the back left for possible future sump overflows (one will be used now as a safety overflow since one canister filter will pump from the 75 g to the 300 g and this overflow will protect from spillage if the water bridge siphon fails). I plan these to be 1.75" holes that will accept a 1" bulkhead. Each should handle 600 gph of flow. A third hole on the back right will be for possible future sump input to the tank.
Then I plan 3 canister output holes (input to the tank) on the right end of the tank that will send flow across the top. The canister input (output of the tank) holes will be on the back right of the tank with elbows and a length of pipe and strainer down to various levels. These would all be 1.5" holes that accept a 3/4" bulkhead.
Questions:
1. Eheim and Ocean clear both use 3/4" tubing so the 1.5" holes should be fine. But should I just drill them all 1.75" to accept 1" bulkheads? The advantage is that I have more flexibility later on if I decide to do a different system (holes can be made smaller with various pvc pipe fittings, but not larger). The disadvantage is that I may have to bother making the holes smaller. But this is quite easy to do. Seems like I should just have them all drilled larger. Any other issues that I am missing?
2. My canister inputs (back right of tank) and outputs (right end of tank) are rather close to each other. My thinking is that this is not a problem since pumps will circulate the water clockwise from above so that it will sweep past the canister inputs and then past the outputs so they will essentially be separated by the flow of the tank. Is this correct? Or is this a bad design? The reason for this design is simply that the back right of the tank will be in a corner, but not all of the way to the right wall. There will be two feet on the end which will give easy access to the right end and the back right of the tank. It will also be out of sight.
Thank you for any insights on these issues. I would like to get it right.
Good idea to drill the holes larger. If you ever needed to make the holes larger, you'd probably need to move the tank. Let me tell you how difficult it is to move large tank/stands after they are set-up. I had to use jacks so that I could move my 190g paludarium tank just 6 Inches. Without the jacks I couldn't get the tank/stand to even budge. I even removed 95% of the water. Once you put the gravel in the tank and get it wet, that tank doesn't want to go anywhere, unless you take the gravel out.
On the rivertank, I line up the intakes and spraybars right next to each other. I don't see a problem with this. My experience is that flow from the spraybars will help keep the intakes from getting clogged. This is a 2 part answer though because of the water-bridge I use. Most waste/debris exits the rivertank through the water bridge and goes into the 85g tank. The rivertank sand stays absolutely spotless. There is not one deadspot in the rivertank and it hasn't needed to be gravel vac'd since I found the butter zone for the water flow.
The 85g tank has a large dead spot near bottom of the overflows, and that's where all the debris collects from the 2 tanks. Right now I have 2 canister intakes where that dead spot is and that still doesn't get everything. Only problem is that these 2 canisters need to cleaned often and the intakes sometimes get clogged. The good thing is that it's easy to only have to gravel vac one small area, which is about 18" x 4", in the entire set-up.

I can not make it that long ,2 weeks at most or the bottom of the cannisters get packed up as they are the lowest spot in your system and your larger system will create proportionally more waste.I would treat 4 the same as two cleaning two a week for a two week cleaning cycle.I think I will be able to clean just one canister each week (This will of course depend on the stocking level).
The issue with this is flow,no water pressure to drive the water out. A siphon tube which you mentioned will be needed to draw from the bottom for adequate filtration. I understand your concern about safety but a lower hole,say at 1/2 way and less tube will be less visual as it may be hidden behind decor....at least except your overflow....I want all holes near the water level.
Not when at the surface as there is no or little water pressure to drive them, they would flow more low in the tank probably ....Each should handle 600 gph of flow
Cannisters are no good at airation, the design does not allow air in the filter so although they filter adequatly the surface will require more to make your loaches thrive. I added a fluval 4 to the surface of mine about an inch up to throw the water across with a major increase in coloration and activity due to the increase in O2. I also blast water into my sump to increase this action , it is very important and not addressed by your set up thus far. I added a little vid that shows some of my 55s with the increase in surface aggitation from previously just having cannisters to illustrate as experiance has pushed me that way (with help from here of course. )All my tanks have these now because of my success with this
On another point the depth of your tank has given me issues here also and I move the water from the bottom up and through the surface with additional pumps now with even more improvement, also with a circular motion in the tank on my deep tank I had stratification (for lack of a better description) low or no airation where my loaches live and hence the flow is down and up now as opposed to around horizontal which previously gave me much success in my smaller tanks.Things are not always the same when getting bigger. Around horizontal does not work well in a deep tank as I do not belive you get a 100% water change out that way .Around vertical does much better and I don't belive the fish care either way and it pushes all the water across the surface for added airation from the surface pump and spray rails.....All the water must touch the surface as much as possible is my point
A vid of surface aggitation in the two 55's to illustrate. This could be increased even further with even better results IMO....

-
Keith Wolcott
- Posts: 720
- Joined: Sun Mar 04, 2007 1:49 pm
- Location: Charleston, Illinois USA
Thank you chefkeith and Tinman. You have given me a lot to think about.
chefkeith- The details on how your system with the water bridge works is very useful.
Tinman- Thank you for sharing your experience with canister filters. Cleaning two every week will work for me.
I will think about your ideas concerning the hole levels.
Concerning surface aeration, I did not explain details. The outputs from the tank will be low so water is drawn from the bottom and then return to the top. Second, I plan to have one small (1200 gph) pump on each end that is aimed up at the surface. I have experimented with this on my current tank and it does a good job of both agitating the surface and moving water from the bottom to the top. In addition, I plan 1 or 2 bigger pumps (3,000 gph) on each end that circulate the water. You may be right about vertical circulation, but I think that I have to try the horizontal method since it fits together with having bogwood and rocks in the center for it to go around. It also sounds like chefkeith has made this work. Do you think that this setup that I have described could work and addresses the important issues that you have brought up?
If you have considered surface aggitation as much as filtration I am sure you are fine. No matter how much filtration you have airation is the key. You must get air to the fish regardless of water conditions. Your tank is very long and has adequate surface area for this to occur. Is was trying to explain as issue that took years to resolve here in a few sentences. Your long tank will give lots of surface area and you will be fine. With a large tank and a fish requiring high O2 levels dead spots near the bottom become deadly and require attention as inside a vortex current. The amount of water reaching the surface of your tank is as important as the amount going through your filter IMHO and often not considered as such.....You are very entune with these fish and understand clear as a bell the O2 requirements I am sure.......I designed spray rails that broke all 60 plus square feet of surface of my system but finally came to realize breaking was not enough. I really had to aggitate it.I mean blast it like a sauna ,the more the better.....and if I would have known up front my fish would be much better for it. My main pump is over 140 gallons a minute with cannisters and sponges added plus Fluvals on the surface and they are still screaming for more! No surface left unblasted.......You need to use the huge surface presented to you at its maximum potential . CK may comment on this ramble as he had a huge horizontal vortex going ......
-
Keith Wolcott
- Posts: 720
- Joined: Sun Mar 04, 2007 1:49 pm
- Location: Charleston, Illinois USA
I think Tinman is right. With circular flow waste may collect in the center under the rocks/driftwood because of the vortex that is created.
There isn't a vortex in my rivertank because of the huge island in the center. The island eliminates anything from gravitating towards the center. I don't have any dead spots because the island is 1 piece and there is noplace for waste to collect under.
For agitation I just use airstones. I could probably use more, but I try to keep the splashing sounds to the minimum.
-
Keith Wolcott
- Posts: 720
- Joined: Sun Mar 04, 2007 1:49 pm
- Location: Charleston, Illinois USA
That makes sense. I will rethink things and try to come up with a set of holes that can be used for the horizontal circular flow and which can readily be changed to a vertical circular flow. That way, I can experiment and use whichever works best. It is quite interesting. The horizontal flow has the advantage that it can readily be established since it goes around stuff in the center (in chefkeith's case, very ideally with his constructed center). It has the disadvantage of dead spots in the center and of not moving water between vertical layers. A vertical flow is great for moving water between vertical layers and probably will have fewer dead spots, but has the disadvantage of it being harder to establish good flow since rocks and wood in the center obstruct the flow. To make vertical circular flow really work, suspended rocks and wood should be used so the flow can go underneath. I think you have done this Tinman, but I did not understand the strength of it at the time. A compromise of both horizontal and vertical circular flow could be done. My 75 gallon kind of has this. I have the bogwood sitting on top of rocks so there is space underneath. Then I have a pump on one end aimed under this, but angled to come out across the front of the tank (the loaches love that area since it has cover and high current). This analysis makes me think that I should push this skew circulation more. Picture a plane that goes through the lower right front of the tank, the upper left back of the tank, and the left front middle height of the tank. The pumps can be aimed so that the water tends to circulate in layers parallel to this plane. This would have the advantages of moving lots of water up and down in the tank for oxygenation and it would also agitate the surface. It also kind of goes around stuff in the center so flow is not so much obstructed by the center stuff. A disadvantage is that in a long tank it may be harder to establish such a flow.
The Tunze pumps (and other similar brands) make it very easy to experiment with the flow in order to get an ideal situation of no dead spots and excellent oxygenation. Dead spots are easy to see after a bit of time, but oxygen levels are not so clear. I have looked around a little, but does anyone have a recommendation for an economical oxygen test kit that works well? With a way to measure oxygen levels, we could know how good different circulation patterns are with respect to oxygen.
The Tunze pumps (and other similar brands) make it very easy to experiment with the flow in order to get an ideal situation of no dead spots and excellent oxygenation. Dead spots are easy to see after a bit of time, but oxygen levels are not so clear. I have looked around a little, but does anyone have a recommendation for an economical oxygen test kit that works well? With a way to measure oxygen levels, we could know how good different circulation patterns are with respect to oxygen.
One thing that I've always though about trying is UGJ's (under gravel jets). These systems use something like Martins river tank manifold, but there are many outputs or jets that are strategically placed throughout the bottom of the tank to help circulate the water and eliminate dead spots.
Here's a good article detailing UGJ's.
http://cichlid-forum.com/articles/ug_jets.php
Here's a good article detailing UGJ's.
http://cichlid-forum.com/articles/ug_jets.php
I have and this is the best explanation of my system dynamics and lack of substrate or minimal sand to keep the flow from being slowed by the irregular substrate surface.....To make vertical circular flow really work, suspended rocks and wood should be used so the flow can go underneath. I think you have done this Tinman
I use pvc as a round has absolute minimal surface contact. My entire decor in my 6' is on three 4" pvc for a stack of rocks with 3 x 18" x 1/4" of contact with the bottom. The other advantage is food suspension for an adequate time at feeding. I use a spiral flow to mix water and hold food as my best compromise. I did not realize the importance of oxygenation until I increased my flow so much it did not mix with surface water and showed in dead or sick fish so I push this to stop you from these issues and hardships of a learning curve.Your post shows an absolute understanding of the fishes needs and your design is well thought out.
My upright 150 has a vertical flow with the introduction of return water adding a slight swirl which can be seen in bubbles and flake when added. The flake at feeding really shows your hydo dynamics well IMHO
I found the fish themselves were the "poverty" meters when I realized what I was seeing . They showed me this in color and activity levels but I was too thick to see it for a long time....I have looked around a little, but does anyone have a recommendation for an economical oxygen test kit that works well? With a way to measure oxygen levels, we could know how good different circulation patterns are with respect to oxygen.
-
Keith Wolcott
- Posts: 720
- Joined: Sun Mar 04, 2007 1:49 pm
- Location: Charleston, Illinois USA
Thanks chefkeith. Those UGJs are really cool. I had not seen them before.
Thanks for the information and kind comments Tinman. The really great thing about this forum is our ability to exchange ideas and gain from each others experience.
I am changing my stand design yet again. My brother the engineer came up with a brilliant idea. A cantilever design (like some bridges). We're still working out details, but I will post the design when we get it done.
-
Keith Wolcott
- Posts: 720
- Joined: Sun Mar 04, 2007 1:49 pm
- Location: Charleston, Illinois USA
The cantilever bridge design for an aquarium stand is ready.
Some details concerning the predicted deflections under load of the ends and center are listed on the diagram. Since we have the end supports out a little bit further than the balance point (when the loads on each of the three supports are equal), the end supports will tend to support more on the inside edge. The deflection calculations with the load on the inside edge are about half as much. They are .002" up on the ends and .004" down on each center span. With the 3/4" plywood top glued and screwed on, the deflections will be even less. Thus, I think this design is really quite nice for supporting the load. I lose some space in the cabinet, but I like how it will look with the ends of the aquarium hanging over space. I think that I can also put one or two canister filters under the end overhang on the right. It is close to a wall and will not really show. If that works, then I am gaining cabinet space. My brother and I have had a lot of fun working on this, but all of the credit goes to him. He thought of the idea of a cantilever design and did all of the deflection calculations.
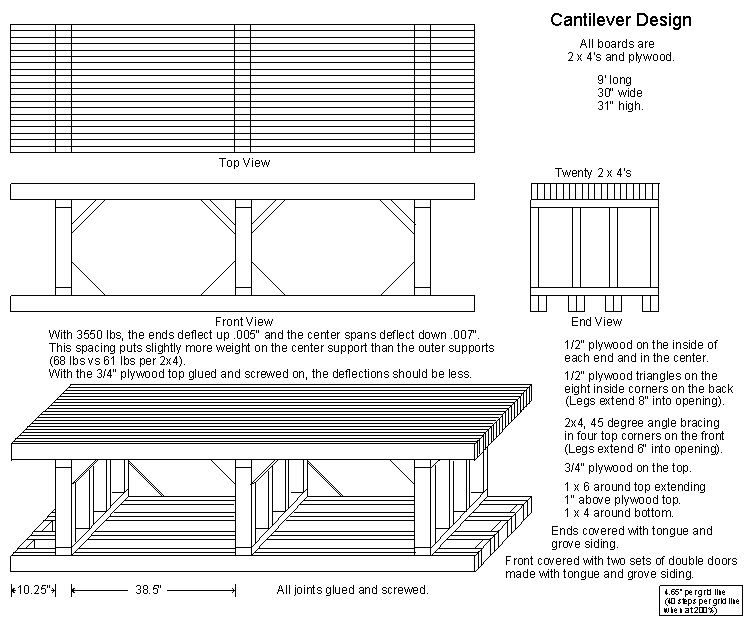
Some details concerning the predicted deflections under load of the ends and center are listed on the diagram. Since we have the end supports out a little bit further than the balance point (when the loads on each of the three supports are equal), the end supports will tend to support more on the inside edge. The deflection calculations with the load on the inside edge are about half as much. They are .002" up on the ends and .004" down on each center span. With the 3/4" plywood top glued and screwed on, the deflections will be even less. Thus, I think this design is really quite nice for supporting the load. I lose some space in the cabinet, but I like how it will look with the ends of the aquarium hanging over space. I think that I can also put one or two canister filters under the end overhang on the right. It is close to a wall and will not really show. If that works, then I am gaining cabinet space. My brother and I have had a lot of fun working on this, but all of the credit goes to him. He thought of the idea of a cantilever design and did all of the deflection calculations.
Who is online
Users browsing this forum: Google [Bot] and 140 guests